Hello PureMVC!
第一次聽到 PureMVC 的時候大概是兩年前,那時候就對這套 MVC Framework 很感興趣,不過當時對於它的架構是有看沒有懂,就一直拖到了現在。
第一次聽到 PureMVC 的時候大概是兩年前,那時候就對這套 MVC Framework 很感興趣,不過當時對於它的架構是有看沒有懂,就一直拖到了現在。
最近因為工作需要用到的關係,所以又再次學習它,經過閱覽無數前輩分享的文章之後,終於初步了解它的運作模式了,因此分享這邊學習心得筆記。
什麼是 MVC ?
一個設計方法(Design pattern 也稱設計模式)。
想初步了解的朋友可以參考 維基百科的說明 。
網路也有許多相關文章,大略內容就是將程式開發架構分為 Model、View 和 Controller 三個部份的開發方式,建議可以閱讀 深入淺出設計模式 這本書。
什麼是 PureMVC ?
一個跨多語言的 MVC Framework,其中我們要用到的是 Actionscript 3.0 版本,這是他們的 官方網站 。
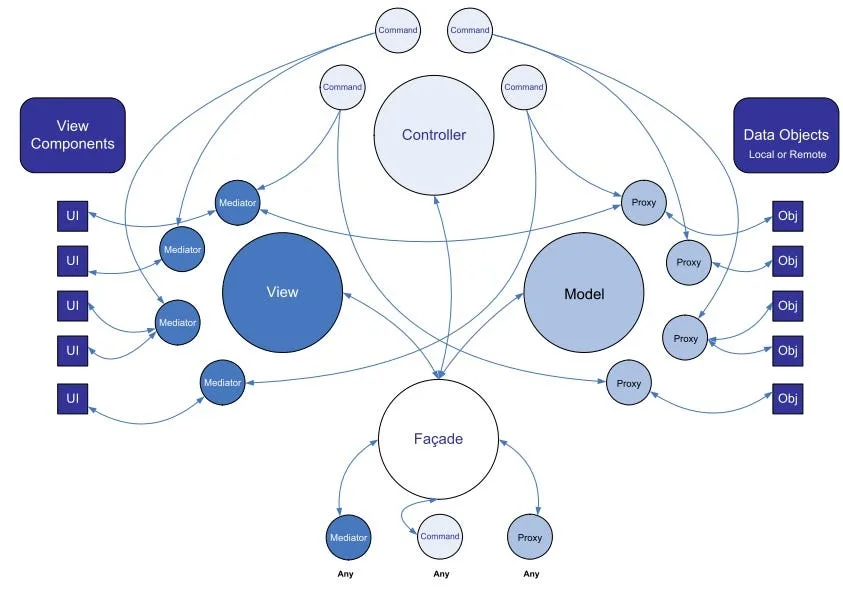
下圖是他的架構圖,除了 MVC 外,它也用到不少其他 design pattern,第一次看可能會霧煞煞,沒關係,我們下面慢慢介紹。
Facade 可以看做是 MVC 之間的共同溝通管道,可以減少程式之間的耦合。
Command 就是扮演 Controller 的角色,PureMVC 寫出來的程式通常都會是以傳送(send)通知(Notification)的方式在進行動作,而 Command 就是負責執行它收到的通知所需要做的事情。
Proxy 從字面上看就是 Model 的代理者,不管是 C 還是 V 要取得使用資料,都必須經過它,這樣的好處是增加後端資料的可抽換性。
Mediator 可以看做是統一視覺元件的介面,透過它更新或取得視覺元件的狀態。
OK,大致上說明了 PureMVC 的概念之後,我們開始撰寫第一個程式吧,我參考了 邦邦的部落格-初探pureMVC這篇文章 ,淺而易懂,是一個簡單的搜尋小程式。
配置 PureMVC 環境 :
這裡我們使用 FlashDevelop 這套好用的免費軟體來開發, 下載FlashDevelop 。
接下來到 PureMVC 的網站, 下載 PureMVC 的 library 。
下載完可以看到 bin 資料夾裡面有個 swc 檔,待會要用的到它。
建立 Project :
安裝並開啟FlashDevelop,開啟新專案。
這裡我們選擇 AS3 Project 來開發。
專案建立完後的架構如下,之後新增的 as 檔都放在 src 資料夾下。
將剛剛下載的 swc 檔放到專案的 lib 資料夾底下。
然後右鍵加入 Library,這布記得要做唷,不然無法使用 PureMVC 的 API。
開始 Coding :
這個程式會有以下四種 Notification (通知) :
- STARTUP — 程式啟動
- INITED — 程式初始化結束
- SEARCH — 搜尋資料
- RESULT — 搜尋結果
還有三個視覺元件 :
- searchTxt — 搜尋字串的輸入欄位
- searchBtn — 送出搜尋字串的按鈕
- resultTxt — 顯示搜尋結果的欄位
一開始我們先寫把 Model 的部分,這個 class 主要負責提供搜尋所需的資料,為了簡化學習,我們只回傳一字串 “ XXX Hello PureMVC! “。
DataProxy.as :
package puremvc.model{    import org.puremvc.as3.interfaces.IProxy;    import org.puremvc.as3.patterns.proxy.Proxy;
    import puremvc.ApplicationFacade;
    /**     * DataProxy     *     * 儲存資料的 Model     */    public class DataProxy extends Proxy implements IProxy    {        static public const PROXY_NAME:String = "DataProxy";
        public function DataProxy()        {            super(PROXY_NAME, "");        }
        public function search(query:String):void {            // 提供外部使用的搜尋 Method.            // 此方法並未真正實作任何搜尋程式.            // 暫時以 query + " Hello PureMVC!" 作為搜尋結果.
            var result:String = query + " Hello PureMVC!";
            var body:Object = { };            body["result"] = result;
            // 將結果包裝成 body["result"] 後傳送 NOTIFICATION_RESULT 通知            this.facade.sendNotification(ApplicationFacade.NOTIFICATION_RESULT, body);        }
    }
}
再來我們寫 View 的部分,MainMediator 主要負責接收 INITED 跟 RESULT 這兩個通知。
INITED 代表程式初始化結束,當初始化結束的通知發出後,MainMediator 就會需要偵聽事件的視覺元件加入偵聽。
RESULT 代表搜尋結果,當這個通知發出後,MainMediator 會將搜尋結果顯示到 resultTxt 這個 TextField元件上。
MainMediator.as :
package puremvc.view{    import flash.events.MouseEvent;
    import org.puremvc.as3.interfaces.IMediator;    import org.puremvc.as3.interfaces.INotification;    import org.puremvc.as3.patterns.mediator.Mediator;
    import puremvc.ApplicationFacade;
    /**     * MainMediator     *     * 主程式視覺介面     */    public class MainMediator extends Mediator implements IMediator    {        static private const MEDIATOR_NAME:String = "MainMediator";
        public function MainMediator(viewComponent:Object = null)        {            super(MEDIATOR_NAME, viewComponent);        }
        override public function listNotificationInterests():Array {            // 此 Mediator 關注哪幾個 NOTIFICATION            return [                ApplicationFacade.NOTIFICATION_INITED,                ApplicationFacade.NOTIFICATION_RESULT            ];        }
        override public function handleNotification(notification:INotification):void {            // 當各 NOTIFICATION 產生通知時的動作            switch(notification.getName())            {                case ApplicationFacade.NOTIFICATION_INITED:                    onInitedNotify(notification);                    break;                case ApplicationFacade.NOTIFICATION_RESULT:                    onResultNotify(notification);                    break;            }        }
        private function onInitedNotify(notification:INotification):void {            // 當主程式初始化結束的動作            setListener(true);        }
        private function get app():Main {            return Main(this.viewComponent);        }
        private function onResultNotify(notification:INotification):void {            // 將取得的 body["result"] 值顯示在 resultTxt 上            app.resultTxt.text = notification.getBody()["result"];        }
        private function setListener(boolean:Boolean = false):void {            // 設定是否偵聽 searchBtn Click 事件            if (boolean)            {                app.searchBtn.addEventListener(MouseEvent.CLICK, onSearchBtnClick);            }else {                app.searchBtn.removeEventListener(MouseEvent.CLICK, onSearchBtnClick);            }        }
        private function onSearchBtnClick(e:MouseEvent):void {            // 將 searchTxt 的值包裝成 body["keyword"] 後發送 NOTIFICATION_SEARCH 的通知            var body:Object = { };            body["keyword"] = app.searchTxt.text;
            this.facade.sendNotification(ApplicationFacade.NOTIFICATION_SEARCH, body);        }
    }
}
接下來我們開始寫需要用到的 Command,這裡我們先寫負責處理 SEARCH 通知的 SearchCommand。
SearchCommand.as :
package puremvc.controller{    import org.puremvc.as3.interfaces.ICommand;    import org.puremvc.as3.interfaces.INotification;    import org.puremvc.as3.patterns.command.SimpleCommand;
    import puremvc.model.DataProxy;
    /**     * SearchCommand     *     * 接到搜尋通知後要做的事.     */    public class SearchCommand extends SimpleCommand implements ICommand    {
        public function SearchCommand()        {            super();        }
        override public function execute(notification:INotification):void {            // 向 MainMediator 取得 body["keyword"] 對映的元件的值            var query:String = notification.getBody()["keyword"];
            search(query);        }
        private function search(query:String):void {            // 將要搜尋的值傳給 DataProxy 提供的 search Method            var dataProxy:DataProxy = DataProxy(this.facade.retrieveProxy(DataProxy.PROXY_NAME));            dataProxy.search(query);        }
    }
}
再來是程式啟動 STARTUP 的 StartupCommand。
StartupCommand.as :
package puremvc.controller{    import org.puremvc.as3.interfaces.ICommand;    import org.puremvc.as3.interfaces.INotification;    import org.puremvc.as3.patterns.command.SimpleCommand;
    import puremvc.ApplicationFacade;    import puremvc.model.DataProxy;    import puremvc.view.MainMediator;
    /**     * StartupCommand     *     * 程式啟動時需要做的事情     */    public class StartupCommand extends SimpleCommand implements ICommand    {
        public function StartupCommand()        {            super();        }
        override public function execute(notification:INotification):void {            // 註冊 Model DataProxy            this.facade.registerProxy(new DataProxy());
            // 註冊 View MainMediator            var app:Main = Main(notification.getBody());            this.facade.registerMediator(new MainMediator(app));
            // 註冊接下來會用到的 Controller Command            this.facade.registerCommand(ApplicationFacade.NOTIFICATION_SEARCH, SearchCommand);
            // 通知初始化結束            this.facade.sendNotification(ApplicationFacade.NOTIFICATION_INITED);        }
    }
}
快結束了! 再來把程式的核心,ApplicationFacade 給完成就差不多了。
ApplicationFacade.as :
package puremvc{    import org.puremvc.as3.interfaces.IFacade;    import org.puremvc.as3.patterns.facade.Facade;
    import puremvc.controller.StartupCommand;
    /**     * ApplicationFacade     *     * 所有程式之間唯一的溝通橋樑.     * 使用到 Facade 和 Singleton 設計模式.     */    public class ApplicationFacade extends Facade implements IFacade    {        // 所有此程式會用到的列舉狀態        // - NOTIFICATION_STARTUP 程式啟動        // - NOTIFICATION_INITED  程式初始化結束        // - NOTIFICATION_SEARCH  發出搜尋的請求        // - NOTIFICATION_RESULT  產生結果的通知
        static public const NOTIFICATION_STARTUP:String = "NOTIFICATION_STARTUP";        static public const NOTIFICATION_INITED:String = "NOTIFICATION_INITED";        static public const NOTIFICATION_SEARCH:String = "NOTIFICATION_SEARCH";        static public const NOTIFICATION_RESULT:String = "NOTIFICATION_RESULT";
        static public function getInstance():ApplicationFacade {            if (instance == null) instance = new ApplicationFacade();            return ApplicationFacade(instance);        }
        override protected function initializeController():void {            super.initializeController();
            // 當 ApplicationFacade 被第一次呼叫的時候            // 會執行這個 initializeController()            // 所以在這裡我們註冊 NOTIFICATION_STARTUP 這個啟動 Command
            this.registerCommand(NOTIFICATION_STARTUP, StartupCommand);        }
        /**         * startup         *         * 程式啟動.         *         * @param    app 主程式         */        public function startup(app:Main):void {            this.sendNotification(NOTIFICATION_STARTUP, app);        }    }}
最後,將用到的視覺元件加一加,然後寫上一行 ApplicationFacade.getInstance().startup(this) 就可以收工囉!!!
Main.as :
package{    import flash.display.SimpleButton;    import flash.display.Sprite;    import flash.text.TextField;    import flash.text.TextFieldType;    import flash.events.Event;
    import puremvc.ApplicationFacade;
    /**     * Main     *     * 使用 PureMVC 來實作一個簡單的搜尋小程式.     */    public class Main extends Sprite    {        public function Main():void        {            if (stage) init();            else addEventListener(Event.ADDED_TO_STAGE, init);        }
        private function init(e:Event = null):void        {            removeEventListener(Event.ADDED_TO_STAGE, init);
            // entry point
            initComponents();
            // pureMVC 的進入點.            // 使用唯一的 ApplicationFacade class 作為入口.            // 之後所有的元件之間溝通都需要經過此 facade.            ApplicationFacade.getInstance().startup(this);        }
        public var searchTxt:TextField;        public var searchBtn:SimpleButton;        public var resultTxt:TextField;
        private function initComponents():void {            // 初始化視覺元件(ViewCompoents)
            // searchTxt            searchTxt = new TextField();            searchTxt.type = TextFieldType.INPUT;            searchTxt.border = true;            searchTxt.x = 50;            searchTxt.y = 50;            searchTxt.width = 200;            searchTxt.height = 20;            this.addChild(searchTxt);
            // searchBtn            var buttonStyle:Sprite = new Sprite();            buttonStyle.graphics.beginFill(0xcccccc);            buttonStyle.graphics.drawRect(0, 0, 100, 20);            buttonStyle.graphics.endFill();
            var buttonTxt:TextField = new TextField();            buttonTxt.text = "Search Button";            buttonTxt.width = 100;            buttonTxt.height = 20;            buttonStyle.addChild(buttonTxt);
            searchBtn = new SimpleButton(buttonStyle, buttonStyle, buttonStyle, buttonStyle);            searchBtn.x = 260;            searchBtn.y = 50;            this.addChild(searchBtn);
            // resultTxt            resultTxt = new TextField();            resultTxt.type = TextFieldType.DYNAMIC;            resultTxt.border = true;            resultTxt.x = 50;            resultTxt.y = 80;            resultTxt.width = 200;            resultTxt.height = 200;            this.addChild(resultTxt);
        }
    }
}
以上是我初步學習 PureMVC 後的心得,更進階一點的介紹可以參考官方的 Best Practice 或更多相關文章。
範例原始檔:
參考文章: